
So you’re finally thinking about solar. Took you long enough, honestly. I mean that as a compliment.
Here’s the thing nobody tells you at the start: the panels are the easy part. What trips people up is everything around them. The roof. The wiring. The salesperson who talks fast and smiles too much. I’ve watched friends nail this and I’ve watched friends get fleeced, and the difference usually came down to whether they slowed down and learned the basics first.
That’s what this is. The basics, from someone who’s been around the block.
Table of Contents
- First, Is Your Roof Worth It?
- What You’ll Actually Pay
- Picking the Gear
- How the Install Goes, Start to Finish
- The Paperwork Nobody Warns You About
- Doing It Yourself vs. Paying Someone
- The Money You Get Back
- Stuff I’d Tell My Own Brother
- Key Takeaways
- FAQ
- Wrapping Up
READ MORE Smart Home Upgrades That Homeowners Love in 2026
READ MORE Should You Install Solar Panels in 2026?
First, Is Your Roof Worth It?
Go outside. Look at your roof. I’m serious.
Half of whether solar makes sense for you was decided when your house was built, by which way it faces and what’s growing around it. South-facing roofs are the dream in the U.S. East and west do fine. North-facing is an uphill fight, and sometimes not worth fighting.
Run through this in your head:
- How old are your shingles? Past fifteen years, replace the roof first. Pulling panels off to redo a roof later is miserable and expensive.
- What’s casting shade? That gorgeous oak in the yard might be quietly stealing a third of your power.
- Is there room? Most systems want somewhere around 300 to 600 square feet of clean roof.
- Where do you live? Tucson and Buffalo both can work. They will not pay you back on the same timeline.
A few years back, a couple I knew in Oregon had their hearts set on going solar. Beautiful property. Ringed by these towering firs that blocked the sun half the day. A straight-shooting installer told them flat out it wasn’t worth it. They were annoyed. They were also twenty grand richer for listening.
What You’ll Actually Pay
Alright. The money talk. This is where folks get burned, so pay attention.
In 2026 you’re looking at roughly $2.50 to $3.20 per watt before any incentives kick in. Translate that to a normal 8 kW setup and you’re somewhere around $20,000 to $26,000 all in.
But that big number lies a little. Once tax credits and rebates land, plenty of people pay a lot less than the sticker.
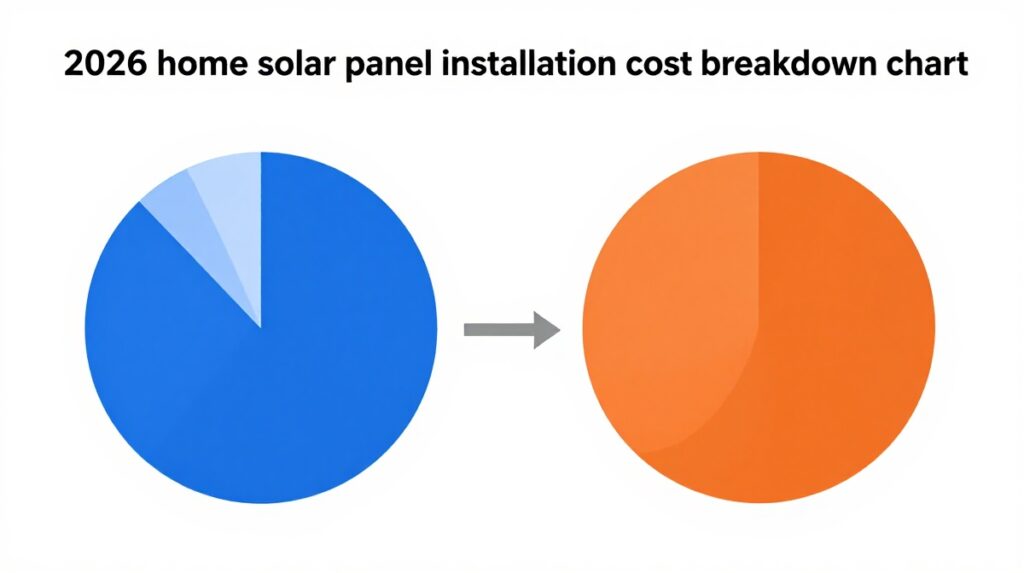
Where does it all go? Roughly like this:
| Cost Component | Approximate Share | What It Covers |
|---|---|---|
| Panels | 25–30% | The modules themselves |
| Inverter(s) | 10–15% | Turns DC into power your house can use |
| Mounting & racking | 10% | The hardware holding everything down |
| Labor | 15–20% | The crew |
| Permits & inspection | 5–10% | Local fees and red tape |
| Soft costs/profit | 20–25% | Sales, overhead, margin |
See that bottom row? That’s the soft, squishy part. It’s negotiable, and it’s padded in this industry. Which brings me to my one non-negotiable rule: get three quotes. Not one. Not two. Three.
Picking the Gear
Three real decisions live here. Don’t hand all three to a salesperson and call it a day.
Which Panels
Two kinds matter:
- Monocrystalline. More efficient, darker and sleeker, costs a touch more. This is what most decent homes get now.
- Polycrystalline. Cheaper, a little less efficient, bulkier. It’s on its way out.
My take? Just get mono. The price gap shrank so much that picking poly to save a few bucks barely makes sense anymore.
Which Inverter
This is the brain of the whole thing, and it’s where people glaze over. Don’t.
- String inverters — one central box. Cheapest option. Catch is, if one panel sulks, the whole string sulks with it.
- Microinverters — a little one on each panel. Pricier. Worth it when your roof has shade or faces a few directions.
- Power optimizers — the middle path. Each panel gets a small helper feeding one inverter.
Got a roof that’s part sun, part shade? Spend up for microinverters. You’ll make that money back in steadier production, trust me.
A Battery, or Nah?
Maybe. Genuinely depends on you.
Lose power a lot? A battery’s tempting. Does your utility pay you peanuts for the extra power you send back? Then storing it yourself starts looking smart. But a battery tacks on $8,000 to $15,000, and loads of people buy one they don’t really need because someone in a polo shirt told them to. Decide based on your life, not the pitch.
How the Install Goes, Start to Finish
Here’s the actual sequence, whether you swing the drill yourself or watch a crew do it.
Step 1: Somebody sizes up your site. Measures the roof, peeks at your electrical panel, checks how the sun moves across it.
Step 2: They design the system. You get a layout showing where panels go and how big the whole thing is. You approve it.
Step 3: Permits get filed. Off goes the paperwork to the city and the utility. Could be days. Could drag for weeks.
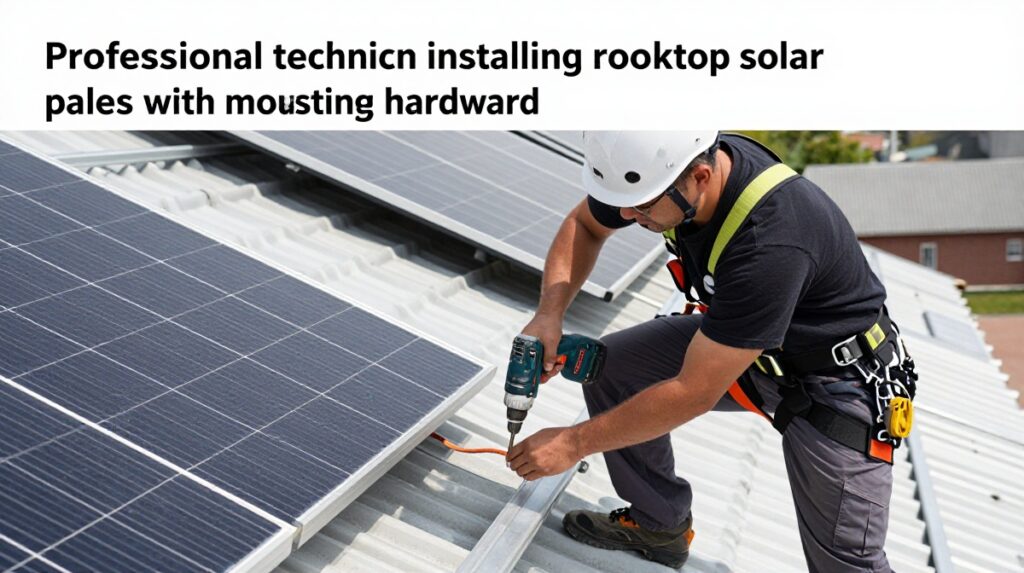
Step 4: Racking goes up. Crews bolt rails and flashing into your rafters. Pay attention here, because sloppy flashing is how you end up with a drip in your ceiling two winters from now.
Step 5: Panels clip on. Fast part. Sometimes done in a single afternoon.
Step 6: Wiring and inverter. Electricians run conduit, hook up the panels, tie it into your main panel.
Step 7: Inspection. A local inspector pokes around and signs off. Then the utility blesses the connection.
Step 8: Lights on. You flip the switch and start watching that meter crawl backward. Weirdly satisfying. You’ll text people about it.
The Paperwork Nobody Warns You About
This part is dull. It’s also where projects go to die, so don’t skip it.
You’ll need a building permit, an electrical permit, the utility’s sign-off on connecting to the grid, and a final inspection before anything switches on. Some towns turn this around in a week. Others will have you waiting two months and wondering if anyone’s even reading your application.
Hire a good company and they handle all of it. Go the DIY route and congratulations, you’re the one taking a number at the permit office. Either way: keep copies of everything. Everything.
Doing It Yourself vs. Paying Someone
Can you do this yourself? Sure, technically. The harder question is whether you should.
| Factor | DIY | Professional |
|---|---|---|
| Cost | Lower upfront | Higher |
| Time | Weeks to months | Days |
| Skill needed | High (roofing + electrical) | None |
| Warranty | Limited | Full |
| Permit help | All you | Included |
| Risk | Every mistake is yours | Insured |
Let me be blunt. If climbing around a roof makes your stomach drop, or if opening an electrical panel sounds like a great way to get hurt, hire it out. The wiring side is no joke, and a bad install can quietly void your homeowner’s insurance. DIY kits are fantastic for the handy crowd doing a shed or a cabin off the grid. For the house you sleep in? I lean pro, every time.
The Money You Get Back
Now the fun part. Some of this cost comes back to you.
The big one is the federal clean energy credit, which knocks a chunk off your system cost. I’m not going to quote you an exact percentage, and here’s why: tax law moves, and whatever number I print today might be stale by the time you read it. Check the current rate with the IRS or a tax pro before you count on anything.
Beyond that, hunt around for:
- State rebates — all over the map, literally
- Net metering — credit for the power you push back to the grid
- SRECs — certificates some states let you actually sell
- Property tax exemptions — your home gains value, your tax bill doesn’t chase it
Stack a few of these and your payback window can shrink fast. I’ve seen people break even in six or seven years and then ride out two decades of cheap power. That’s the part that feels like cheating, in a good way.
Stuff I’d Tell My Own Brother
A handful of things I wish everyone knew before signing on a dotted line:
- Three quotes. I said it before. I’ll die on this hill. The spread on identical systems is genuinely shocking.
- Find the production guarantee and read it. A solid installer promises a minimum output. Make them put it in writing.
- Check the workmanship warranty. Your panels will outlive your dog. Cheap labor won’t.
- Walk away from pressure. “This price is only good today” is a salesperson telling on himself.
- Don’t buy more than you use. Build for your real bills, not somebody’s commission.
- Look the company up. Solar pulls in fly-by-nighters. Read the bad reviews, not just the glowing ones.
Key Takeaways
- 2026’s a good year for it: prices are down, incentives are still around.
- Your roof’s angle, age, and shade decide more than the panel brand ever will.
- Budget roughly $20,000–$26,000 before incentives for a normal system.
- Mono panels plus microinverters is the safe default for most houses.
- For your main home, paying a licensed pro is usually money well spent.
- Three quotes. Read the warranties. Then relax.
FAQ
How long do solar panels actually last? The panels themselves usually carry a 25-year performance warranty and keep going past that, just a hair weaker each year. The inverter’s the part you’ll likely swap somewhere around year ten to fifteen.
Do they even work when it’s cloudy? Yep, just dialed back. On an overcast day you might get 10–25% of normal output. They feed on daylight, not blazing sun specifically.
Should I replace my roof first? If the roof’s getting old, yes, do it before the panels go on. Taking them down and putting them back later is a needless headache and cost. Ten good years left? You’re fine.
How much will I really save a month? Hinges on your usage and local rates, but cuts of 50–90% off the bill are common. In sunny states with good net metering, some folks pay next to nothing.
Can I just install it myself and pocket the savings? On a shed or off-grid cabin, absolutely, if you’re handy. On your main home, the roofing and electrical risks usually tilt the scales toward hiring a pro.